Casting bronze into soapstone

Last year I tried to make havettes out of bronze, in a couple of hours one evening at Kentwell. You see, I started making the mould pre-pandemic, but didn’t manage to cast into it, not having enough time.

It is the mould and havette casting as discussed here in this post:

And here is the mould as I was working on it, with a pewter test piece beside it:

So last year I cast a few more pewter examples just in case I needed to do a sort of lost metal casting and in case the mould broke at least I would have a sort of record of what it was like. Then I added bronze to a crucible I had and put it into the furnace. It took a while to melt, because the furnace needs refurbished, but I was able to get it to the right stage of readiness and meanwhile I had heated the mould too. The casting did not succeed, as is usually the case, probably because the metal was not quite hot enough to flow well. Anyway, here it is:

However, as you can see the mould looks a bit odd. The stone was much more blue before I started, but now looks strange and the lead pins in the other side of it, there to hold it together, don’t fit quite right either. I assume this is because they were overheated when I warmed the mould and perhaps too the heat from 1100 C Bronze was a bit too high as well.

The bronze itself appears to have frozen in the mould, despite my pre-heating the mould almost hot enough to melt the lead. The bronze might not have been hot enough either, it was the first time I used the furnace for 2 years and I am out of practise.

Either way, what also happened was that a piece of the stone in the middle of it broke off because the bronze gripped it too tightly when it froze. This is annoying, but not entirely unexpected. The stone at least survived the molten bronze otherwise, as expected since soapstone has good thermal shock resistance, but the amount of heat that went into the stone, 1100 C down to 20C, was enormous and it might be worth using larger pieces in the future to better dissipate the energy. I also think that the type of soapstone will be important to how resilient it is when used for bronze casting. It may well be best for me to get hold of some other types of stone to try and cast bronze in, various sorts of mudstone seem to have been used in the past.

In the meantime I shall carry on trying to cast lost wax or use the fine powders that I have used. Getting hold of the right stone and preparing it will take some time, it is quite hard to get stone to a state with flat surfaces that can be carefully mated together. I should probably try approaching a stone mason or supplier of stone, but in modern times they are so specialised that it might not be a request that they can deal with.

An unusual ingredient in casting a bronze vessel

While reading the book “Weights and measures in Scotland” by Connor and Simpson last week I noticed that the Jedburgh measuring jug, made in 1563 holding an ale pint, about 108.7 cubic inches, or 1.78 litres, had iron chaplets! Which is very odd, I have only ever read of bronze ones.

Jug pictured here:

Chaplets are little bits of bronze the same thickness as the pot or other item will be, placed around the mould between the inner and outer parts in order to make sure they don’t move around too much or shrink in or move and make the wall thinner than it should be.

You can see this picture here, the chaplets go in the space between the two parts of the mould, between the core and the cope, in the space filled by the metal:

They can also move when the casting is done, Butler and Green mention one or more bronze cauldrons where they are washed down out of their proper place by the inrushing liquid metal and others where they are not very well stuck onto the cast metal, perhaps because it was cooling too much when it reached them. They are apparently normally made by chiselling a square piece out of sheet metal.


So why would there be iron chaplets in this jug? Sure, they aren’t going to corrode away that quickly but using a non identical metal makes little sense.

The book “English Bronze cooking vessels and their founders 1350-1830 by Roderick Butler and Christopher Green is the go to book for cooking vessels, which were made in much greater numbers than official measures and I can’t find any mention of the use of iron chaplets. The foundryman David Rowan who made some measures in the 1550’s and 60’s, was of French descent and more importantly master founder at the royal ordnance workshops in Edinburgh castle. Which makes me think of checking Biringuccio for any mention of chaplets.

Unfortunately I have temporarily misplaced my copy. I had a look in Cellini but can’t see mention of chaplets, which certainly are not so important in lost wax casting, although I note that this Jedburgh measure was apparently cast using the lost wax process.

Would there be any advantage in having iron rods through the wax, holding the inner core in position? That’s about the only main advantage I can find, but why not use bronze ones, maybe there were none handy? In this case perhaps the metal was poured in such a way, from above, the rim side of the mould, such that the core had to be held in place, in the same way as a cannon would have it’s core held in place by a framework above the mould. Perhaps iron rods are best for this. Then after being cast, the precise volume can be checked and the rim smoothed down to ensure it is correct.

I wonder if any other items have such chaplets in them.

Reverberatory furnaces and their roof span

I was reading a new acquisition, a book about furnace design and construction, when I noticed that it had a chapter on furnace strength and problems with furnaces, so I naturally wondered how it compared to historic reverberatory furnaces and their construction. Basically, a reverberatory furnace is where the fuel is burnt at one end, and usually by a sort of chimney effect, hot air and gases are brought over the top of the metal to be melted, the heat reverberating from the roof of the furnace. I really want to build and operate one to make copper alloy castings, but that is quite a big project.


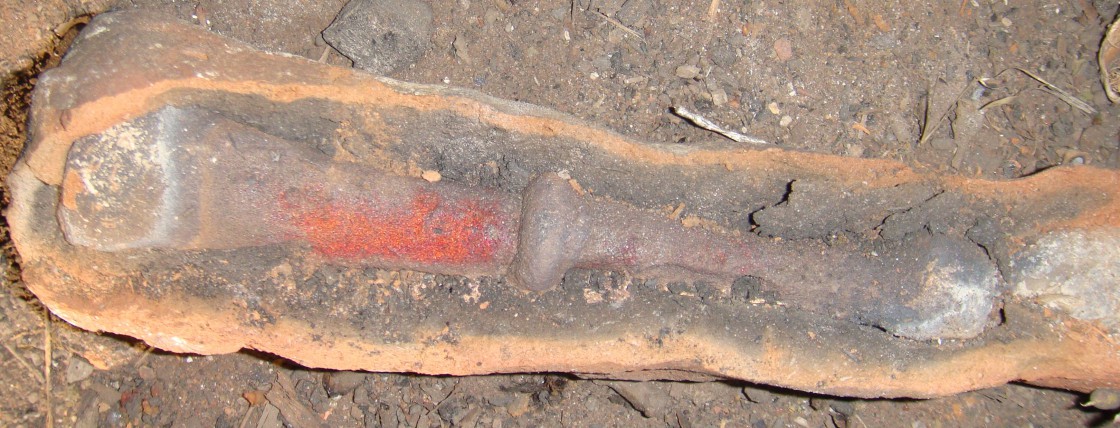
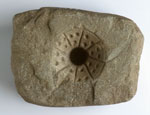
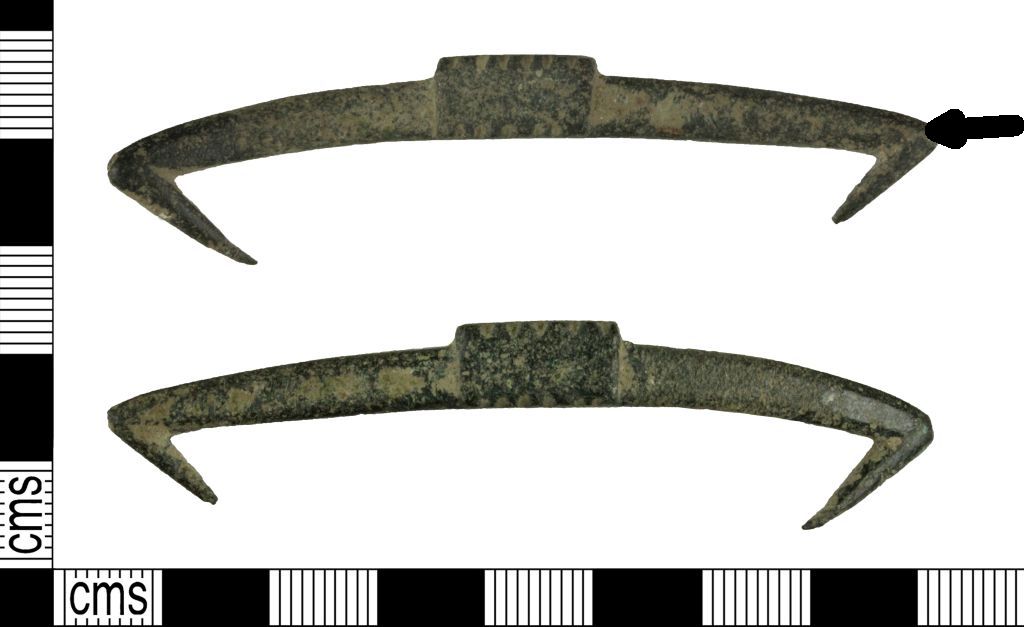
These two photos show top and side view of Biringuccio’s reverberatory furnace design:

This type of furnace goes back to the 15th century or earlier in Europe, probably around 1500 in England and Scotland. It is built with bricks and clay and mortar and I think should end up with a lot of movement of the bricks in the roof as they expand and contract with the furnace heating up and cooling down, potentially causing various problems. As it says in Industrial Furnaces, Vol 1, by Trinks and Mawhinney, published in 1961 (5th edition, first came out in 1923), page 292, this first quote not necessarily covering reverberatory furnaces but is I think useful to note,

“… it is desirable to consider the places where failure is most likely to occur. Prominent among such places are roofs. Wherever material spans an opening, there must be tension in some part of the covering. Because hot refractories are extremely weak in tension, it is usually taken up by cold steel lying outside of the furnace. The refractory part of a roof can then be put wholly into compression.”

It carries on in page 293, more relevant to our needs – “Between room temperature and furnace temperature of 2200F, fireclay bricks expand about 0.075 in. per ft, or about 0.6%. The inside of the arch becomes longer by that amount, while the outside maintains practically it’s original length. Several things can happen under the influence of this expansion. The abutments can be pushed apart, the bricks can be compressed, or the arch can rise.”

Page 296 – “It may be stated however, that roofs of heating furnaces seldom fail from crushing of the arch bricks. Occasionally a very hot luminous flame melts an arch down; in other cases, ash is blown against the roof, sticking to it, and acting as a flux which causes the roof to melt; but as a rule, the rather rare collapsing of an arch is due to other causes, the most common of which is the yielding of the abutments (Skewbacks), and pinch spalling.”

(The spalling seems to result from rapid cooling of the bricks so different areas contract at different speeds so surfaces flake off, if it happens often enough the bricks lose strength)

This prompted me to look at the main historical sources I know of about reverberatory furnaces and more importantly, I happen to s in English translation. These are the works by Biringuccio (1540) and Cellini (1568 or so), both of whom used reverberatory furnaces in the 16th century. I don’t know of any other accessible sources for the period, and there are not many after either although I am sure they were written about. (Makes note to see if early modern sources can be found) So I read through the relevant sections of both to see what they say about the pitfalls of building a reverberatory furnace.

Cellini is not much use, declining to give a drawing of a furnace, then spending a lot of words describing how to make the very important floor of the furnace properly so it does not break under the force of the liquid metal. When it comes to the roof, he merely wrote “After the bed you build up the vault with similar bricks in the same way, … “

He is very picky about the properties of the bricks that you must use, so we can assume the ones he wants us to use do last well in the heat. Most interestingly, his design seems to let the flame and such out the far end of the furnace at the roof height. More modern designs assume you have a chimney of some sort at the far end of the furnace away from the firebox.

Biringuccio is also not much use, not describing any particular issues with roofs of furnaces.

He wrote:

This is made of baked bricks, or of crude ones if desired or of suitable fire resistant stones. … (2 pages later) I have sometimes made them with bricks and laid them with the white clay that glassmakers use for making their pots and furnaces. Peperino also servers very well and a black rock flecked with white spots of the talc inside, whoe name I cannot tell you but it is found in Valcomenica in the Brescian region, …”

The vault itself is described thus:

Thus built in this shape, I have had the vault begun not only over the firebox but also over the place for the bronze. I have taken pains to arrange that the vault of the firebox should be somewhat lower than that of the furnace, and that the aforesaid convex should be somewhat lower than that of the furnace, and that the aforesaid convex be commenced as desired from the part of the wall where it abuts a little above the level of the arches, curving in such a way that all the flamed, beating against it, press against the opening of the window that leads into the furnace. Likewise I have also had the vault made low above the taphole, so that when the flames are beaten back they may fall forcibly upon the metal.”

But that is about it. Nothing useful, no personal experiences or anything. At the moment, it looks like there wasn’t much of a problem with such furnaces and their roofs.

There is of course a clear assessment that you need furnace bricks which will survive the fire, and it is implied that if you do not, then things will go very wrong. But then if you use the correct bricks then things will go well and your furnace will work. Moreover if you look at the thickness of the walls in the drawings near the top of the post you will see the furnace is intended to be very strong and therefore should resist the walls being pushed apart by the expanding bricks in the vault, even if Biringuccio doesn’t make much of it.

Of course one difference is that nowadays we build to last and to minimise maintenance. Back then I suspect they rebuilt parts of the furnace after every few firings but finding any evidence of this is difficult. Also, if you did carefully choose the right stone or bricks to make it from, and built it well, there would be no problem with the roof pushing the side wall out, or of spalling. A roof to keep the rain off would definitely be a good idea though, but it seems that such a weak spot in a furnace was not a major issue or it was assumed you would add a roof of tiles or temporary one of wood.

Indeed I have read of one in Italy I think, which was in the basement of a large building, and therefore completely protected from the weather.

Casting spindle whorls – 2019/ 2020 update

I started this post 2 years ago, but clearly it is time to do an update.

Since then I’ve not managed to perfect new whorl moulds, but have done more research into them, which has thrown up a few things.

Mould manufacture

The critical issue I have had is in making holes for wooden spindles that are vertical and at right angles to the faces of the mould stone. This really needs a column drill or lots of skill and practise, so in my big mould of new whorls, things aren’t quite right and this has slowed my production of new designs of them.

The other issue is running out of good stone to carve them from. Tracking some down is difficult, and always has been. I need fine grained stone which is moderately soft, so that I can carve it without too much trouble. I don’t want to pay lots of money for carefully cut soapstone online.

Casting

This isn’t usually too much of a problem, but some skill is needed because I have made the moulds out of irregularly shaped stone. Sometimes I have to tip the mould at an angle such that it fills from the bottom up and the air is pushed towards the to, which is really important when doing the large 14th century one.


New discoveries:

The biggest thing I have found is the 2016 paper by Eleanor Standley (Spinning Yarns:The Archaeological Evidence for Hand Spinning and its Social Implications, cAD 1200-­‐1500), which is basically a literature review of archaeological information about spindle whorls in the medieval period.

It is interesting, informative and wide ranging.  She has done a good deep dive into the literature and available sources, covering the materials used, when they were used and puts forwards some ideas which are worth thinking about. If you are interested in spindle whorls you should go and read it.

However there is one major howler that I have noted within it.

She refers to half a mould found in Dunkeld,

Dunkeld whorl mould

and suggests that the lead was poured into it and wiped off the top, then this was repeated and the two halves soldered together. This is a strange thing to suggest, because of the many ramifications of it and just how hard it would be to do. Firstly you have to get both sides of the whorl to a nearly liquid temperature. Which would be very fiddly to do. Then you have to stick them together without any obvious overlap or joining ridge, which would be almost impossible. If we had found a lot of them that were slightly mismatched in terms of one side or the other being offset, that would be one thing. Or else, if they were slid down a wooden stick so that they matched together perfectly that might solve that problem but still leaves the issue of the perfect join that they exhibit.

This method of course would also work only for biconical ones, not the asymmetric ones which are seen more in the high medieval period.

There is a general lack of lines marking joins in moulds in lead spindle whorls, you can see this even in ones I’ve made myself. I think this is partly to do with how viscous liquid lead can be, and also how it shrinks when it cools.

Another important thing to note with manufacture is the case of whorls which have two different patterns on them, as if two different halves which fitted together were used. It does rather suggest to me that the manufacture was carried on by a small number of professionals whose moulds were well made and interchangeable in some ways. To me this is much more likely than two different halves made in different moulds and soldered together.  These photos are taken from the Portable Antiquities scheme Finds database, finds.org.uk and show either side of the same spindle whorl, as tweeted by Graham Rawson last year or so.

Anyway, back to Standley.

The condition of the Dunkeld mould, as just one part of a probably set of moulds, is entirely normal for stone moulds for metal casting. In the UK we don’t have many stone moulds; one of the biggest collections is at the Herbert Museum in Coventry. I have examined their moulds, and they are mostly 1 or sometimes 2 parts of what were clearly 2 or 3 part moulds. This is the case almost everywhere there are stone moulds, only 1 out or 2 or 3 parts has been recovered. It seems a causal factor for their disposal in a context we eventually excavate, that most of the mould is broken or lost. So in this case I see no reason to confuse matters by thinking that whorls can be made using just one side of a mould.

She tries to bolster her case by referring to whorls found that are clearly incomplete or damaged, and registered on finds.org.

I have examined all the relevant ones that I can see on there, and they are more like mis-cast ones that I have made using a 2 part mould. The strange shapes are what you get when the mould is opened when the lead is still liquid, or not held together properly or not enough metal is poured into it. A key point to note though is that I have been informed by my expert spinners that it doesn’t matter if the whorl is not balanced, it will keep turning nonetheless. Plus they have seen many partly hollow metal detector finds themselves, which were clearly poor castings yet were still sold on and used.


Standley does rather leap ahead of me in her paper with reference to post-medieval use of spindle whorls. This I had heard about from Beth the weaver and after some thought reckoned it was very likely, and Standley’s linkage of it to lead whorls found more in certain parts of the UK is definitely worth pursuing further. She also points out that there are dateable imported ceramic whorls that clearly continued in use for a long time after the medieval period, making it likely that the lead ones continued in use too.

So my next step, when we are allowed to meet other people, is to use a friend’s column drill to make perfectly vertical holes in soapstone in order to make 2 or 3 different whorls of greater perfection than before.

I note too that there is someone selling recreated ones for £12 or more on ebay, clearly I am in the wrong job because I only charge 2 or 3£ to people I know.

I suspect also that bronze moulds might be used, especially for more early modern ones, enabling thousands to be made without any trouble.  Ultimately it would be nice to compare all the whorls on the finds database, for different sizes and patterns and shaped. As of writing this, April 2020, there are 6,602, of which 3,970 are lead. Not all will be medieval, but I think most will be that or post-medieval.  I believe further research on the regional distributions of patterns is underway or being considered.  In the meantime I shall continue to research and make my own ones.

My new dilemma – where to put the ingate and vents

So I want to carve some soapstone for casting bronze havettes. I have a couple of largish pieces of stone that I just need to flatten properly on one side, to make a two piece mould. The question is where to put the ingate. Should I run the bronze down a channel and fill the mould from the bottom? That way the air is forced out the top, but I’ll need to carve an extra channel for the pointy bits. Overall this way has produced good results when I’ve done it using lost wax.

havette wilt-e0afbc one

Should I put it in the side and tilt the havette slightly so that it flows up? That isn’t too bad an approach, although it does rather hasten the filling and I think increases the chances of air bubbles.

havette wilt-e0afbc two

Should I just pour in the top and hope for the best? This is usually the worst way, unless the mould is open enough to be able to let air out all around, since the air coming out will have to mix with the liquid metal coming in.  It also leaves more messy sprue around the outside to clean off.

havette wilt-e0afbc three

I know, lets have a look at some real ones from the portable antiquities scheme.

Unfortunately, despite them being pretty good photographs, it isn’t at all clear. If I handled one myself I could have a better idea, but at the moment it isn’t obvious. They may even have been made with lost wax method, but what makes it difficult to say is that they will have been finished off with the sprue cut off and the area sanded down.

https://finds.org.uk/database/artefacts/record/id/897784

This one for instance, in order to make it work properly the hooky bits need to be filled. But it is pretty smooth all over, with perhaps a small bubble at the bottom where the hook joins the main body. The decoration is probably made using a file.

https://finds.org.uk/database/artefacts/record/id/882498

Is slightly bent, again, hard to judge what it was cast into or how it was cast into.

I like this one, it’s a bit pitted but clearly shows how pointy the spikes are.

https://finds.org.uk/database/artefacts/record/id/810783

I suspect that they were made with much larger spikes to be ground down into proper spikes. Which means that if the bronze came into the mould that way, there would be less evidence for it since it was ground away.

In the end all I can do is try a method and see how it turns out.  I am minded to go for the first and second ones, the stone is big enough to do that.

My next thing is working out how to hold the two halves of the mould together when the bronze is being poured into it.

What I actually did on the foundry at Kentwell in 2017

This year, we had four of us, all having been to Kentwell before, and two with well over a decade each under their belt.

I was head of station, and often referred to the others on the foundry as Master Alexander. Which was especially nice when I had just corrected something or made a useful comment about things. My many years experience has given me a good foundation of knowledge and confidence about my own capabilities and knowledge.

The great thing about having experienced people there was that all I had to do was mention a few facts and answer their questions and they immediately incorporated it into their spiel to the public. I was initially a bit stressed on Sunday because it was the first day and I didn’t quite know what I had to work with, but the three of them swung into action and by Monday were talking convincingly to school children about various things.

The week did start a bit badly, because I found on Saturday night when dropping my stuff off (After driving 430 miles, so a bit tired) that someone had adapted the furnace to look like this:

Kentwell 17 furnace front top


Continue reading

Making a forge the historic way

Several people I know are making or remaking blacksmiths forges from the medieval period. Now obviously there are some changes in precise equipment used and various other things, but the designs have ended up fairly similar, due to the need to have portable forges.

The base is usually, but not always, a wooden box, because what is more authentic than wood, and can be easily worked to your desired shape. The interior can be filled with fire bricks, insulation or sand, topped off with something clay like, which can resist heat and yet not look wrong. This photo is of an iron box, although the interior of it and other bit look authentic enough, I’m not so sure about using a box.

portable medieval firebox

So, now to the sources.

Firstly, we have Theophilus, circa 1122.

He seems to suggest using two wooden boards, upright, at right angles to each other, with the space inbetween and up them filled with clay:
“Then take some freshly dug clay, neither kneaded nor mixed with water, and start by putting a little of it into this space and compact it well with a round piece of wood; then put in some more and ram it down again. Continue in this way until two thirds of the space is filled, leaving a third empty. Then take away the board in front, and with a long knife trim the front [edge} and the top of the clay flat and smooth. Then strike the clay hard with a slender piece of wood. After this take some clay that has been kneaded and mixed with horse-dung, and build up the first and a hearth for it. Coat the wall [of the building] also so that it will not be burnt by the fire. Pierce the clay through the hole at the back of the board with a slender piece of wood. Build all smith’s forges in this way.”

When we turn to the 16th century, Biringuccio has a few pages on the art of the smith who works in iron, it is not his personal speciality or area of knowledge, so whilst he describes some secrets, and artistic descriptions of the work carried out, there isn’t anything directly related to forges.

The nearest we can get is with the descriptions of how to make various sorts of hearths for melting bronze in. These are functionally equivalent to forges.

For instance, “Then it is filled with clay, very well pressed and beaten in, and a hollow is dug out in the middle as deep and wide as you think will contain the material that you wish to melt. Having prepared the bottom and made a hole as an exist for the bronze, and having put in the iron pole, cover it all very well with ashes that are moistened with water in which salt has been dissolved. Then back it, and putting the bellows in their places where you have set the tuyeres, proceed a you did when you melted with a hearth.” (Page 289 of the Dover paperback edition)

Biringuccio does love his salt water moistened ashes as a final outer layer over any clay lining, and it does work well. Well burnt ashes are by their nature very refractory and survive a fire well.

Unfortunately I haven’t found much about any surviving medieval forge hearths. There are a few mentions in archaeology journal articles but they are hidden behind paywalls.

So it would be interesting to compare the performance of hearths built out of clay and coated with ash, or clay with an outer layer of horse dung mixed in. The horse dung would hold it together better as it dried, and give some porosity after being fired, which might help it be more insulating. On the other hand that might make it a little more fragile and prone to damage when moving things about in the fire.


Something different – iron smelting

A re-enactment group I know are good friends with a venue in the Lakes District, near where iron used to be mined. They are interested in carrying out a medieval iron smelt at some point in time.

This blog post therefore is a wee summary of what I know about it at the moment, based on one particular interesting paper I found recently, along with some pictures.

The paper is this one:

http://openarchaeology.info/bibliography/twenty-five-years-bloomery-experiments-perspectives-and-prospects

https://www.academia.edu/4263490/Twenty-five_years_of_bloomery_experiments_perspectives_and_prospects_2013_

There are many topics that the paper brings up, all of which are important if you wish to have as easy a re-creation of a medieval bloomery as possible. The simple fact is that our ancestors spent generations refining their metallurgical techniques, and ignoring what the archaeology and practical experiments tells us would condemn us to spend many years in re-creating the same things as have been done before. I see no need to do that, because, as with Tudor bronze casting, it will be quite difficult enough as it is even if we do everything right, so it is important to learn from previous attempts.

In the abstract is a list of topics that are examined that seem to me to be very important and I will first discuss them below based on my knowledge without having properly read the paper:

the nature of the furnaces, the bellows and blowing rates; the ore, charcoal and clay

types, quality and treatment; and the operating conditions, the products and the losses of material through the refining process.

To start with, the nature of the furnaces. I have been unable to find out much about lakes district furnaces in the late medieval period, but it seems obvious to me that since blast furnaces had not reached that part of Europe, they were the typical chimney shaped bloomery furnace. This will have to be fully confirmed by reading more widely in the archaeological literature.

They are called bloomery furnaces because they produce a ‘bloom’ of iron, like you can see being hit with hammers in the darkness in this photo:

Striking iron bloom

The furnaces would have looked something like this, with the second photo showing slag flowing out of the furnace:Iron smelt bloomery at work

Iron smelting tapping slag

Continue reading

What I actually did on the foundry at Kentwell

This year, we had four of us, all having been to Kentwell before, and two with well over a decade each under their belt.

I was head of station, and often referred to the others on the foundry as Master Alexander. Which was especially nice when I had just corrected something or made a useful comment about things. My many years experience has given me a good foundation of knowledge.

The great thing about having experienced people there was that all I had to do was mention a few facts and answer their questions and they immediately incorporated it into their spiel. I was initially a bit stressed on Sunday because it was the first day and I didn’t quite know what I had, but the three of them swung into action and by Monday were talking convincingly to school children about various things.

The week did start a bit badly, because I found on Saturday night when dropping my stuff off (After driving 430 miles, so a bit tired) that someone had adapted the furnace to look like this:

Kentwell 17 furnace front top

It’s the oddest bodge job I’ve seen for a while. After fuming for a bit I worked out that we would be better to reduce the volume of it using old bricks and bits of tile and such, and scavenged them from the foundry and the pottery.

Which turned it into something like this:

Kentwell 17 crucible in fire2

Continue reading

What I wanted to try and do at Kentwell this year

I was going to put this up two weeks ago, but forgot amongst all the hassle. So here it is as a taster for my next post.

It is nearly time for my annual pilgrimage to be a Tudor at Kentwell hall in Suffolk. This year, like last year, I am running the foundry. This year we have 4 of us, which is a good start, and three of us have prior experience.

So, what I want to try and cast are:

Lead spindle whorls, medieval and tudor date, with 6mm and 10mm internal holes.

Pewterbuckles and suchlike.

A bronze mortar and pestle.

Bronze seal matrices and purse bars, using the lost wax technique.

More complex but interesting things I might try include casting into tin oxide to make buckles, but also to try and make bronze moulds for making a seal matrix or bullets or suchlike. Which involves embedding the patron or sphere in the tin oxide on one half of the mould, and then casting the bronze into the other half of it in such a way that I have a lump of bronze with a shape like a seal matrix in it. Then I can bang out dozens of clean, good seal matrices.
This idea courtesy of the Historical Metallurgy society AGM and conference, where Kevin Leahy mentioned a bronze mould for casting seal matrices.

It is really nice to have actual confirmation of bronze moulds existing in the medieval period, and likely having been used for casting bronze or lead objects. I’ve been investigating casting for years but moulds really do not survive much at all.

We will also try to make a bell, since one of my co-workers is a campanologist, using sand casting and maybe using clay, it all depends on what we use as an original. I don’t have a bell, but there are some still on the foundry.

It should be quite a busy week, it all depends on the weather and how much charcoal we have.