Tinning copper and bronze, part 1

This is something I’ve been meaning to do for years, it happened often enough in the medieval period, to cooking pots and also some buckles and the like, basically anything which would look nicer with a shiny corrosion resistant surface. I tinned iron nails many years ago, but somehow never got around to trying it on copper or bronze. It is a sensible thing to do to a cooking vessel, to ensure it doesn’t taint the food you are cooking.
So, this is how you do it, according to Biringuccio (Page 369 of the paperback Dover edition):

“To do this, a little salt and vinegar is boiled and the vessels are cleaned well inside with this. Then some tin mixed with a fourth part of lead and with some powdered Grecian pitch is melted. The tin is applied as you wish by rubbing it all over the outside and inside with a brush of tow tied to the point of a tool or held with a pair of tongs.”

I’ll skip using the lead for obvious reasons. And I don’t have any tow, which presumably would be made from flax or hemp rope. The pitch acts as a flux, helping prevent oxidation of the liquid tin and lead. I have other substances which might do, such as lard or beeswax.

In order to tin the group cauldron therefore, I set it up like this on a fire:#

cauldron on fire

It took a while to heat through due to the mass of bronze. Continue reading

Tin and building works – what is it for?

I was having a quick look through “The Welsh castles of Edward I”, by Arnold Taylor, when I found mention of the purchase of 160 pounds of tin for use in the building of Beaumaris castle in Anglesey in the late 13th century.

This naturally had me wondering what use tin was in building works. Tin is a weak metal, and not much use by itself. Almost every use requires it to be alloyed with something else. Lead and tin make pewter, tin and copper make bronze. Actually quite a few nice shiny pilgrim souvenirs and ampullae used nearly pure tin because of that shinyness. But you don’t make them for building a castle, gold and silver are much more popular with the workmen.

You certainly don’t put it in the lead for roofing, that would make it stronger but also less able to be beaten out into shape and around corners.

The last use I could think of would be tinning iron nails or other ironwork. Not only does this make it shiny it also helped inhibit rusting.

Theophilus, writing in the 12th century, recommended tinning iron nails and sheet iron used to bind wood together for making an organ. Biringuccio in the 16th century uses tinning on the inside of bronze or copper vessels to ensure that they do not taint food. He no doubt would have tinned iron as well had it been his job.

I also think that some small or large copper alloy castings were tinned to make them look like silver.

So I think the most likely use of the tin was for tinning nails. I have tinned nails before, using Theophilus’ recipe, but it is trickier than you would think, I really should have another go at it.  This photo shows the tinned nails.

tinnednailslanark08

You need a deep crucible for the liquid tin, nice clean iron nails, and to get the temperature of the tin and nails just right, as well as a steady hand when dipping them.


Since I wrote this wee post, I have found a mention of using tinned nails in buildings, but cannot recall where I read it.

Three original spindle whorls

I got these from ebay last year. Now, to have a closer look at them.

Firstly, lead spindle whorls are hard to date, and there is little agreement about when they are from, because in Britain at least, there aren’t any properly dated examples. Instead they are found in the countryside where they have fallen from someone’s spindle.

Continue reading

What I did on my holiday this year – bronze casting

Once again, I was on the foundry at Kentwell hall in Suffolk.

This time, I was the master of the foundry. Unfortunately there was a slight lack of assistants, so there were 2 of us most days. Still, I managed to get a few things done and refine my understanding of the processes and equipment.

Last year, which I meant to write up and publish but never really did, involved a group of us trying to make cannon. We failed, due to lack of time and lack of appreciation of the difficulties. Replicating the techniques of 16th and 17th century foundry work, even with at least 3 of us having a great deal of expertise, was something that would have taken more than the 8 days that we had, and so we failed. Just two more days would have been enough though. Which isn’t bad, all things considered.

For those who don’t know, this is the foundry at Kentwell, first the bellows end and then the furnace end:

bellows end of kentwell foundry 2016 furnace of kentwell foundry 2016

Continue reading

Casting into powder, a method from Biringuccio

Something I’ve been wanting to try since last year is casting into powder to make small objects, which is an interesting thing to test for real experimental archaeological reasons. This is done by following the instructions of Biringuccio in his Pyrotechnia (published in the 1540’s). (page 324 for the powders, and 326 for the method for making up the boxes, of the Dover paperback edition)

The simplest way to do it for me was to make a wee casting box from sheet wood that I had lying around:

Wooden casting box April 2016

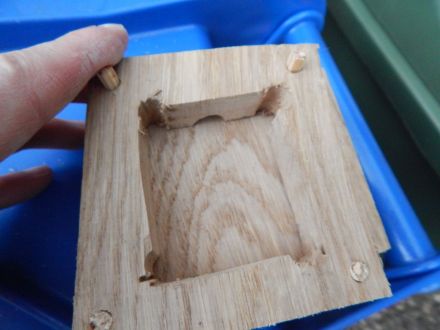
Note the dowelling rods to hold it together, and the fact that I carved the open parts out by drill and saw. This photo is of one side, with the outer piece of wood to hold the powder in, underneath the middle hollow bit.

It is big enough to make 1 large or 2 medium sized buckles, or some buttons or something. If I make it too big I’ll need lots of powder to fill it and it’ll be more of a pain to deal with. It is then bound together with string when ready to use, and you can see the pouring hole at the top, which will rapidly get burnt from the molten metal. Only I forgot the string, so held it together between two bricks when I was casting.

The archaeological aims are to see if it is possible to use the powders, and how well they do, and whether there are any obvious indications of such a method on the finished product, i.e. how much work would be required to finish it off, compared to my usual clay casting. Then there is the question as to whether the powder is damaged by the heat and thus forms a sort of ash or slag that can be identified or overlooked in a dig. It also seems to be an area of experiment that nobody else has tried, although I lack the language skills to tell if someone else abroad has done it before.

Now, the powders that Biringuccio says to use are quite varied, but you can immediately see that they are all heat resistant. Quote:

“Powders are also made of crushed brick, tripoli, vine ashes, tiles, and glazed drainpipes, or burned emery, calcined tin, straw, and of burned paper and horse dung as well as of young-ram’s-horn ashes and many other things. The goodness of all these depends on three things; namely on receiving the metal well, on being so fine as to be almost impalpable, and on their being made with a magistery that renders them hard and strong when dry.”

He also mentions another of two parts pumice and one of iron scale, pounded finely. The other powder he spends most words on is made from a burnt and pounded loam originally made from fine grained earth or gravel or river silt, mixed with wool cloth cuttings, spent wash ashes and horse dung.

This last one is a little time consuming to make, so will be made later.

This post is about the use of calcined tin, which was some purchased from a chemical supplier, and of a fine, floury consistency. Biringuccio above said to add a magistery to them, by which he meant the magistery of salt. Fortunately I tried burning salt in a silica rich environment last year, so added some salt solution made from that salt. (More on the magistery of salt in another post)

Now, onto the trial.

Making up the bronze to be cast was simple enough, so I will ignore that.

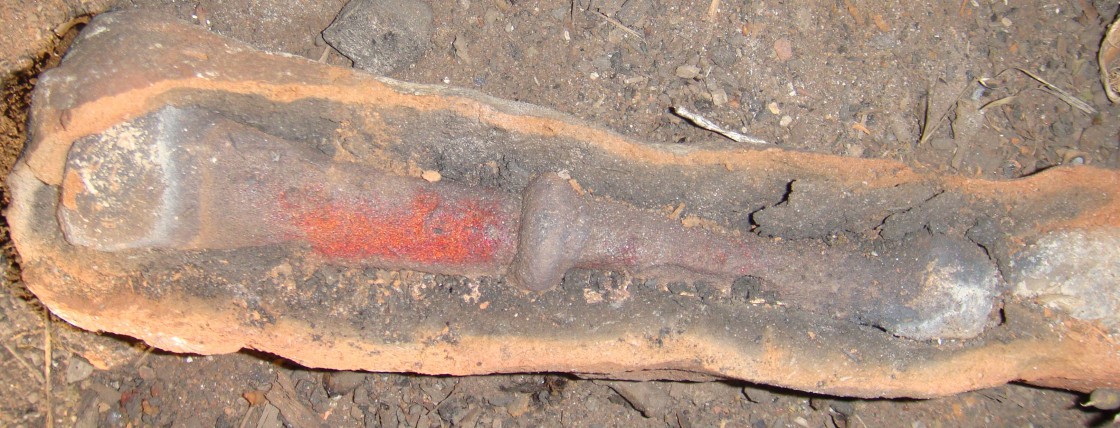
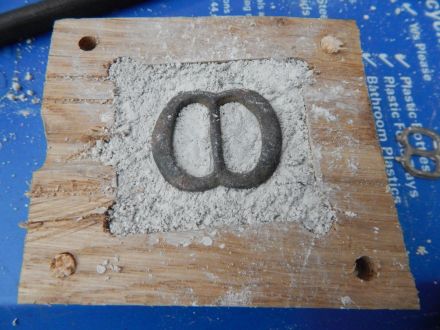
Instead, the interesting and complex bit was making the mould to cast into. Firstly, I made the tin oxide damp with the magistery of salt solution, but it ended up a bit lumpy. I tried pressing it into the mould, which was easily enough done, but it was never of a smooth consistency. Ultimately, when I was trying to press the buckle into it I came to the conclusion that I should have dampened it a lot more. Biringuccio wrote:

“…that has been slightly moistened for moulding, as I told you, so that by pressing with the ends of the finders and with the hand it holds together as well as possible.” (Page 326)

But there is a fair bit of room for error here, I think it holds together at a wider range of dampness than the actual wetness that would make the moulding turn out best.

Nevertheless I soldiered on. The first photo shows the buckle on the powder:

Casting powder buckle in frame April 2016 Continue reading

Interesting article on Viking/ Scandinavian casting methods, compared to what I know and have done

http://web.comhem.se/vikingbronze/casting.htm

It shows a number of things. One is that you can do casting with a comparatively small and simple hearth, with bellows feeding a tuyere. This is not of course news to many people, but it does also indicate the sort of improvements in technology that took place over the following 500 years as furnaces got bigger and bigger. Yet they could make some sophisticated and high quality items on such a small fire.

The hearth is clay lined, on stones, very simple to make, and only about 6 inches long.

He mentions some of his experiences, 15 minutes to melt a crucible of bronze is about right, I’ve done it in that time on my small setup. There is a photo of a double hearth, with one suggested for the melting, and one for heating moulds. I usually do both in the same hearth, which if it is large can mean losing a mould in the charcoal. Otherwise I just put a firebrick at the bottom at the far end of the oblong hearth, and thus less charcoal builds up there with less air getting at it, which ensures a lower temperature there, ideal for moulds.

He spends some time on the moulds, going over the advantages of lost wax casting.

It seems the crucibles were made from sand tempered clay, which is always good, but you could only get one or two meltings from each one, which I say is because it is hard to get the right sort of clay, he points out that the crucible turns glassy when used. If you use a whiter high alumina clay then it doesn’t get so glassy, but a high iron one glasses up very quickly. He then says that he uses sand tempered stoneware clay, as far as I can see stoneware clays are for higher temperature firing, and thus are more heat resistant, so of course that is what to use.

Interestingly potters have evolved their own separate nomenclature that is not directly based on scientific analysis, so they say stoneware or earthenware or describe a clay by it’s type of firing and colour.

Now, one of the interesting things is that he says the mould (made from clay, sand and horse dung) should be completely burnt through, with no organic matter left. This is partly to ensure that there is no unreacted lime within the mould, from the clay. Yet he says that this is in contrast to the historic moulds, which are often poorly burnt, oxidised red on the outside and black through the middle, which can make the casting hard to do. The reasons he suggests for successful casting are that they used zinc copper alloys which were better at getting into the moulds through being less viscous and having a lower temp.

Importantly he notes that the clay mould conduct heat slowly, so you have time to take it out the fire and pour into it without rushing, which is a good point. This also permits the manufacture of finely details pieces, because the metal stays liquid enough to get into all the corners.

Clearly I have a lot of practise left to do because my castings don’t turn out the way his do. The secret is in the mould.

Modern information that helps us understand casting practises

Exhibit A, the phase diagram for a copper- tin alloy, usually known as bronze (Stolen from wikipedia or wherever):


Bronze phase diagram

Along the bottom is the weight % tin, i.e. if the object weighs 1kg, and is 50% tin, there is 500g of tin. Sure, that doesn’t seem as scientific as going by mols, but then a lot of metallurgy harks back to before it was properly integrated into modern chemistry. Continue reading

Making medieval bells – part 1 (A never ending series)

So, wanting to get on with things this year I recalled that I had a couple of medieval type bells to re-create. I also have some instructions for their manufacture. Naturally my resources to make bells are limited, so I am looking mostly at the smaller sort.

However after doing some reading I thought it would be easiest to organise things to stimulate the actual making and associated blog posts by bell type and date, starting earlier.

The earliest information I have about bell making is from the 12th century On Divers Arts, by Theophilus, a work you will all no doubt be familiar with.

He gives some instructions for making two types of bells, one the familiar sort that is put in a tower and tolled, and the other that is hung up and hit with hammers. The shape of the two sorts is in fact quite different, something that I hadn’t really realised before.

I imagine this difference is down to the different acoustic demands from the bells, but more research is of course needed.

(This short article seems to point towards some answers: http://www.photomodeler.co.uk/applications/documents/bell_vibrations.pdf As far as I can gather, the bell studied vibrates in different modes, i.e. up and down, side to side, etc, at the same time, so obviously if your bell is very much different in shape it will produce different tones and such through vibrations being different)


The above photos show two bells, the one on the right definitely being medieval, the left one I think more post-medieval, made abroad judging by the inscription on it. Inscriptions on medieval bells is a whole ‘nother blog post by itself, they have been studied a fair bit. Anyway, note the very slightly different shapes, the earlier they are the more vertical the size, but both have raised ridges round the outside, allegedly from wire used to hold the mould together.

The smaller bells though, Theophilus hardly describes, instead spending time making sure you know that in order to make them sound in tune when playing, the amount of wax for each bell should be carefully controlled, and he uses the method of dividing the wax in proportions, halves, eights etc. So by volume, rather than by weight as a modern person might think of doing.

Unfortunately he doesn’t say exactly how the bells are made, one assumes the same way as the larger ones. Theophilus also points out that you have to be sure to use only the wax for the bell and add extra wax for the yoke by which it is hung and the vents for the mould. Which is very useful advice.

The translators of Theophilus helpfully include a 12th century drawing showing such small bells in use, from MS B 18, fol. I, St John’s College, Cambridge. This can be seen here, the bell player in the top left:

http://www.joh.cam.ac.uk/library/special_collections/manuscripts/medieval_manuscripts/medman/A/Web%20images/beast.htm

Usefully, someone on twitter also linked to this:

http://www.metmuseum.org/visit/visit-the-cloisters/in-season/2015/sounds-of-the-cloisters-a-new-refectory-bell

A 13th century German bell used in a refectory to signal the time to dine. It looks quite thick and heavy, but surely sound good when struck. I note that the yoke at the top has a seam on it, suggesting to me that it was made a little carelessly, when they smoothed the two parts of the mould together, or else it was not made of wax originally but a wooden or other pattern was used, which was then removed before the casting.

So the thing to do in the off season is play about with the wax I have and see what I can make, bellwise, starting with such bells.

Incredible sets of medieval moulds found in France

A few years ago at Mont San-Michel, a lot of stone moulds for pewter casting were found.
Here is the link

http://www.inrap.fr/preventive-archaeology/Events/Virtual-exhibitions/Virtual-exhibitions/Making-Pilgrim-Badges-at-Mont-Saint-Michel/The-site/p-1475-lg1-The-site-and-the-discoveries.htm

They are 14th and 15th century pilgrims badges, often showing St Michael, or the Virgin, or a sword. The detail and artistic skill is wonderful to see, far above my own. 260 fragments were found,

Quote:
“This excavation is exceptional in that it has revealed a workshop for the making of pilgrim badges, the first to have been found in France to date. Exceptionally, the activity is clearly shown by the objects found, the cast-offs, and the archaeological structures, even if the latter are incomplete.
It was not only a workshop for the making of finished objects for pilgrims, but also for the making of moulds for this activity, as indicated by the numerous waste products, rough mould shapes and reworked examples. The whole chain of production was on one site.

However, it is not clear why certain faultless intact moulds were abandoned, especially when it is clear that this type of object was considered to be precious and was transmitted from generation to generation. “

The above indicates a problem similar to that I have mentioned to do with the Coventry moulds, that is, why were they dumped? Many of the Coventry ones are not obviously damaged. What the article doesn’t specify is how faultless the dumped moulds were. It is entirely possible that still usable moulds would have been dumped when fashion changed. Or maybe one part of them broke.

It is interesting though that the moulds were made on the site they were used. What is unclear from the historical records and finds in the UK is whether the pewterer carved his own moulds. I think they may have done so in some occasions, but in others purchased them from stone carvers, but I am not aware of any definite evidence either way. It has been suggested that engravers did the carving, and even that some carved bronze moulds for pewter casting, although none of them have survived. Somewhere more isolated like Mont San Michele would not be conducive to a division of labour, whereas in a town it would be easier to find a good carver.

The website says:
“The quality of the engraving, characterised by great attention to detail, bears witness to the work of craftsmen in full possession of their art, but who were also dependent on the wishes of the monks of the abbey. Written sources inform us that the moulds were the property of the monks and were made at their demand. The monks then entrusted them to metalworkers for the manufacture and sale of the badges, an important part of the profits being paid back to them.”

which still leaves it a bit unclear who the monks had make the moulds and sits oddly with the fact that the casting and the mould making happened in the same workshop.

The photos of moulds that they have made available indicate the usual methods of manufacture, but what is interesting is that they are made of schist and limestone. The limestone is probably from the same source as the Caen limestone, but the schist is not so easily located, perhaps coming from Breton quarries. According to the website the most detailed carving is in the finest grained schist, which makes sense. But oddly the geology book I just consulted says that schist is a moderately metamorphosed rock, made up of very platy minerals, such as mica, which in a schist are large enough to nearly be visible to the naked eye. Which would to my mind make it not very good for carving. If it is so fine grained that it isn’t obviously so wavy and platy, then it isn’t a schist. Certainly some of the Coventry moulds are highly metamorphosed mudstones and the like.

They have the usual holes for locating pins, vents for air etc. One has a clear saw mark in it, proving that they cut the stone up using saws.

Some day I’d like to have a look at these moulds.